Sunday, March 11, 2012

Grey Knights done and a Dark Elf Dragon

Hi all. Been a while since the last update. Things just seem to get busier and busier. My gallery and oil paintings have really been taking up just about all of my time. So, no time to make any tutorials... yet.

But I do have a lot of pictures of new figs. I'll post color recipes below each image


Gold: Calthan Brown, Devlan Mud (x2), Snakebite Leather, Bubonic Brown, Skull White
Steel: Adeptus Battlegrey, Badab Black, Codex Grey, Fortress Grey, Skull White,
Horns/Claws: Scorched Brown, Bestial Brown, Snakebite Leather, Bubonic Brown, Menoth White Base, Skull White
Black Scales: Chaos Black, 50/50 P3 Coal Black and Chaos Black, Coal Black, Coal Black + Fortress Grey
Purple: P3 Beaten Purple, Badab Black, Beaten Purple, BP+Skull White
Dark Grey Skin (dragon), Basecoat of 50/50 Chaos Black and Adeptus Battlegrey, highlight by adding in some Khemri Brown for a couple layers. Highlight that mix by adding in Fortress Grey.


I think I've already shared all the recipes for the Grey Knights. Though if you see something that I haven't shared before, feel free to ask. I'll be happy to answer.

Monday, February 6, 2012

Dread Knight (alternate color scheme)

Hi all. Been very busy lately (though that seems to be usual for me).

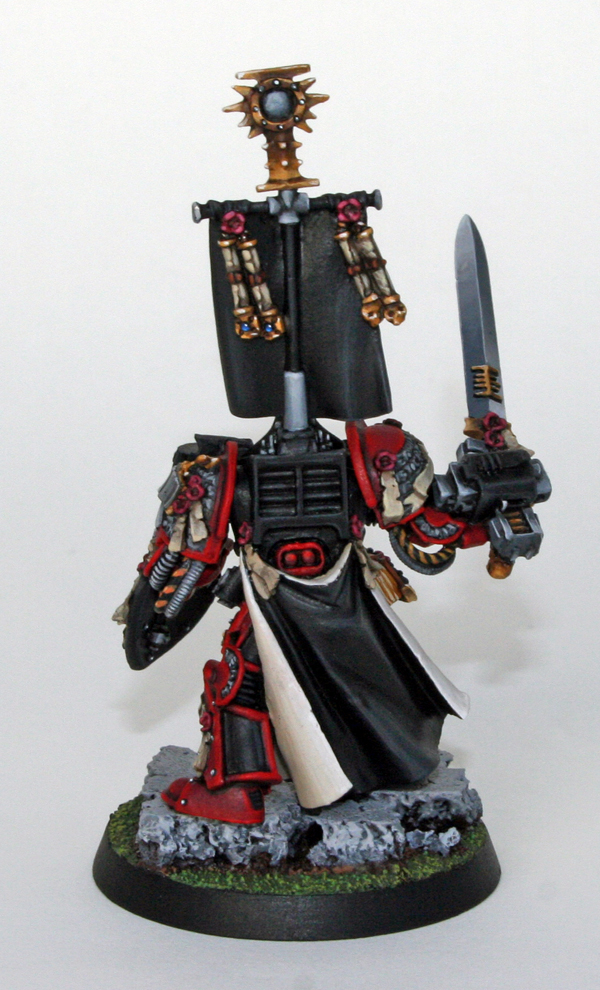
I've got a Dread Knight painted for commission. The commission has one more of these, a rhino, and a character. When I start painting the next DK this week, I'm thinking about making a step-by-step tutorial for some of the NMM techniques.

I'm thinking two good subjects would be:
-Scratched armor
-Weathered/dirty steel (such as the exhaust pipes)

Anyway, on with the pics.


Here's some of the recipes if anyone is curious:

Gold: basecoat 50/50 Calthan Brown/Snakebite Leather, wash Devlan Mud, highlight Snakebite Leather, highlight up to Skull White.

Red Armor: basecoat Scab Red. Badab Black wash in the crevices. Highlight Scab Red+Blood Red. Final highlights of thinned Blood Red on the edges. Scratches/chips were basecoated with black, highlighted with Codex Grey, Fortress Grey, and then Skull White.

Steel (exhaust pipes) Basecoat Codex Grey, highlight Fortress Grey, highlight Skull White (sparingly). Dirt/smoke was added with a watered-down mix of Scorched Brown and Chaos Black. Begin at one of the holes in the pipe and move the brush upwards. Keep most of the dirt wash near the top. Final highlights/scratches were made with Fortress Grey and Skull White.

Base: Black undercoat. Heavy drybrush/basecoat of Scorched Brown. Rocks were heavily drybrushed with Adeptus Battlegrey, Codex Grey, and Fortress Grey. Dirt was drybrushed with Calthan Brown and Bubonic Brown. The green/grass areas were heavily drybrushed with Catachan Green, followed by Goblin Green, Camo Green, followed by a very light drybrush of Bubonic Brown. The rusted pieces of metal debris were painted with Scorched Brown, followed by washes/stippling of Vermin Brown and Blazing Orange. Scratches were added just like on the red armor.

If you'd like any other color recipes, please feel free to ask.


I've also started posting some more of my pottery up for sale on my Etsy shop. If you are in the market for some handmade ceramic stuff, please take a look:

http://www.etsy.com/shop/mattsterbenz

Thanks for reading. Until next time,

Wednesday, January 25, 2012

Elves and Dwarfs

Got a huge update. Things have been really busy lately. I've found a little bit of time to work on that Empire Captain, so there should be an update on him later on in the week. Unfortunately I have not had the time to make any tutorials but that should be changing pretty soon.

First up we have a Mage from the Island of Blood set. Remember that Phoenix Guard test figure? Same color scheme. Though I did fiddle around with the scheme a bit and added some white to it. The customer and I agree the color scheme looks a lot better now.


I ended up painting the mage in three parts. There's just too much intricate detail to paint in one piece.

Next up is the Phoenix Guard, with the improved color scheme. The images are really big this time. (Right click and open the link in a new tab/window to see it at full size).


And next up we have the group of 20 Dwarf Rangers. They all have the hammer/wing plastic shields from the warrior box sets.


More updates to come soon. For now I need to get some sleep! I don't think there's any new color recipes in this update, but if you are curious about what colors I used for anything, feel free to ask.

Monday, January 2, 2012

First mini of the new year.

A start, at least. After a year of painting only commissions and not finishing any figures for myself (I did start a couple projects but they got abandoned) I really intend on finishing this one. The past few years I have seen a decline in my desire to paint non-commission figures. Maybe this is the start of something bigger. Who knows, I may hit up the Golden Demons again. ;)


The first thing that you may notice on this guy is the undercoat. Normally I go with chaos black spray, but I figured I'd try something different. This is white primer along with a wash of Badab Black. Its sort of like the best of both worlds.

I am trying some more of those fabric textures again. I have promised a tutorial of this stuff in the past, and I do need to get around to finishing that too. Too many projects, too little time.

I gave the white fabric some purple shading. I figured that grey or brown shading would clash too much with the cloak or armor.

NMM steel recipe: Codex Grey, Fortress Grey, Menoth White Highlight, Morrow White, shading with a mix of Adeptus Battlegrey+Regal Blue, and shading with Chaos Black.