Friday, October 28, 2011

Chaos Dwarfs finished, and a Skorne figure

Got some final photos of the Blood Bowl team by Greebo miniatures. Not the best photos as I still don't have a good lighting setup.


The Blood Bowl team is now on its way to France. God speed!

I was pretty impressed with the sculpting quality of the Skorne Titan Bronzeback. The casting quality was pretty good too. Some gap-filling was needed but nothing too complex. This is one figure I wouldn't mind painting again, but to a very high showcase quality. Maybe one day when I have the time...

If anyone is curious about the colors used on the skin (a new recipe I came up with), here's the recipe I used:

(P3 and GW)
-Thornwood Green
-Devlan Mud (x2)
-Thornwood Green
-Bastion Grey
-Cryx Bane Highlight
-Cryx Bane Highlight + Trollblood Highlight
-Very thin glaze of Gryphonne Sepia Wash all over
-Ogryn Flesh Wash in select areas

Up next are the Dwarf Slayers and Ironbreakers. I am putting blue Celtic designs on the Slayers.

Wednesday, October 12, 2011

Quick way to sculpt cracked dirt / desert bases

On a recent Blood Bowl commission I was asked to make cracked dirt / desert bases. I came up with a pretty quick and effective way of sculpting them. All you need is some standard Milliput epoxy putty, a base (warmachine in this case) a needle and a GW sculpting tool.

Begin by covering the slot with a piece of card and some super glue. Mix up some putty and press it down on to your work surface. Use a sheet of paper or something you don't mind throwing away afterwards.


Now to start applying the putty. Using the "spoon" end of the sculpting tool, scoop small clumps of putty and smear it onto the base. The more clumps, the better. Don't use any water or lubricant. Milliput has a tendency to crumble when your sculpting tool is too dry, and we want to capitalize on this.


I like to start in the center and work my way towards the edge. In addition to making these clumps, I like to lightly drag the sculpting tool over the surface in some areas. This creates more cracking and texture. If you do this right you won't need to add any sand or other textures to the base.


You can see some of the base showing through on the right hand side. That's fine. It will help create more depth if there are a few spots like that. When the base is fully covered, add a few extra clumps here and there.


Now that the base is covered with clumps and texture, we want to smooth some of them. Clean off your sculpting tool with a paper towel (you will probably find that there has been some buildup of putty). With a little bit of water on your tool, gently smooth down some of the lumps and high points. Use a side-to-side or circular motion. We want to keep those cracks between each clump, so be careful not to press down too hard with the tool.


Smoothing complete. Now take a needle tool and trace some of the cracks between the clumps. Don't overdo it. In this case, less is more. Follow the pre-existing cracks, improvise a little, and you can create a really natural effect. Once you have finished adding extra cracks, take the GW sculpting tool again and press down on some of the clumps near the edges, to help close in some of the cracks. This helps create some irregularity in the width of the cracks. You don't want them all the same thickness.

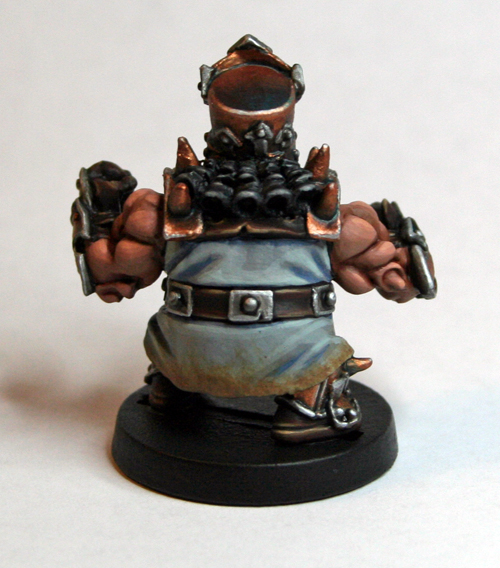
Finished base! Paint it in your favorite desert color scheme and add some light brown/dead static grass.


In case you are curious, the color recipe for the finished base here is:

Calthan Brown, Graveyard Earth, Bubonic Brown, Menoth White Base, Gryphonne Sepia Wash, Menoth White Base. GW dead static grass.

Sunday, October 9, 2011

Infinity figures

Some of my basic Tabletop Quality figures. 


Saturday, October 8, 2011

Dwarfs!

Well, a bit of a Dwarf teaser. I've only one lamp at the moment and that makes it really difficult to take pictures of full units. So those will have to wait. For now I've got a figure from each of the units I am working on. Right now the Slayer unit (15) is finished and the Ironbreaker unit (24) is nearly done. The Longbeard and Ranger are both single test figures for those units (I think there's 20 figures in each of those units).

I've come up with a few new color recipes for these models that I'm rather fond of now. I'll be sure to use them more in the future. I'll list them below the photos.

Anyway, on with the show.


Light Wood: Khemri Brown, Hammerfall Khaki, Menoth White Base, Chestnut Ink (old GW).

Bright Bronze: 50/50 VMC Brassy Brass/Hammered Copper, Devlan Mud, Dwarf Bronze, Dwarf Bronze + Mithril Silver, Mithril Silver, Chestnut Ink.

Gromril Armor (Bright, polished steel on the Ironbreaker): Chainmail, Badab Black (x2), Chainmail, very light glaze of Blue Ink (very, very watered-down), Mithril Silver on the edges.

Bright Gold: VMC Brassy Brass, Devlan Mud, Shining Gold, Shining Gold + Mithril Silver, Mithril Silver, light glaze of Yellow Ink (old GW)

Thursday, October 6, 2011

Long break

Hey everyone. It's been over a month since my last update. Things may have been quiet in these parts but I have still been really busy painting. Here's a quick peek at what I'm working on:

This is the test model for a small Skorne Warmachine force. These Cataphract Cetrati models are quite possibly the absolute worst models I have ever built/painted (and I have painted a LOT of models). Just about every problem you could possibly have with a model is on this one. Here's a quick rundown:

-The absurd looking flags sticking out of the model's back are too small to pin. Fortunately they have a little "tab" to stick into a socket in the shoulderpads, which, with a lot of effort and fiddling, I was able to get them glued in.

-Next, they have weapons that are 5 sizes too big (though that's what Warmachine is best at) and the join is on the wrist which is very small (just barely wide enough to be pinned).

-None of the parts fit together well. There was so much fiddling and fussing with this kit, I think it will have to go on my x-list of models I will refuse to paint in the future.

-I guess Privateer Press really wanted to create some bad blood, because there were 3 packing problems with this box. They gave me the wrong size bases, the captain/sergeant's body was not included, and one of the shoulder pads was badly miscast (missing half of it). Oh boy.

Anyway, on with some pictures. At least it was easy to paint.


Next up is a Chaos Dwarf Blood Bowl team, produced by Greebo http://www.greebo.it/greebo/home1.html

I was really impressed with the quality of these. A couple small "booger" miscasts (mold needs to be replaced), but that was it. Pieces fit together well. The figures are very well-sculpted. Simple to build, fun to paint. Since these will be traveling to France I put two pins in each of the arms. The horns could fit only one pin each. These guys shouldn't be breaking for a long time.


Lastly we have the start of a small force for the game Infinity. I really like how these models look. Unfortunately I don't think they have been designed with gaming in mind. All of the joints and limbs are extremely small. While this looks great for scale purposes, it makes them an absolute nightmare to assemble. This wolf guy, however, was perfectly fine. A much-needed breath of fresh air after building the rest of the force.


Phew. Thats a big update. So big that I'm going to have to do it in two blog posts. Coming up in the next couple of days is a HUGE Dwarf army update. Stay tuned.