Hi all. Been very busy lately (though that seems to be usual for me).
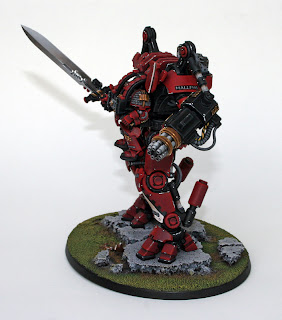
I've got a Dread Knight painted for commission. The commission has one more of these, a rhino, and a character. When I start painting the next DK this week, I'm thinking about making a step-by-step tutorial for some of the NMM techniques.
I'm thinking two good subjects would be:
-Scratched armor
-Weathered/dirty steel (such as the exhaust pipes)
Anyway, on with the pics.
Here's some of the recipes if anyone is curious:
Gold: basecoat 50/50 Calthan Brown/Snakebite Leather, wash Devlan Mud, highlight Snakebite Leather, highlight up to Skull White.
Red Armor: basecoat Scab Red. Badab Black wash in the crevices. Highlight Scab Red+Blood Red. Final highlights of thinned Blood Red on the edges. Scratches/chips were basecoated with black, highlighted with Codex Grey, Fortress Grey, and then Skull White.
Steel (exhaust pipes) Basecoat Codex Grey, highlight Fortress Grey, highlight Skull White (sparingly). Dirt/smoke was added with a watered-down mix of Scorched Brown and Chaos Black. Begin at one of the holes in the pipe and move the brush upwards. Keep most of the dirt wash near the top. Final highlights/scratches were made with Fortress Grey and Skull White.
Base: Black undercoat. Heavy drybrush/basecoat of Scorched Brown. Rocks were heavily drybrushed with Adeptus Battlegrey, Codex Grey, and Fortress Grey. Dirt was drybrushed with Calthan Brown and Bubonic Brown. The green/grass areas were heavily drybrushed with Catachan Green, followed by Goblin Green, Camo Green, followed by a very light drybrush of Bubonic Brown. The rusted pieces of metal debris were painted with Scorched Brown, followed by washes/stippling of Vermin Brown and Blazing Orange. Scratches were added just like on the red armor.
If you'd like any other color recipes, please feel free to ask.
I've also started posting some more of my pottery up for sale on my Etsy shop. If you are in the market for some handmade ceramic stuff, please take a look:
http://www.etsy.com/shop/mattsterbenz
Thanks for reading. Until next time,
I am writing a BOOK!
7 years ago


Hi Matt,
ReplyDeleteSorry to be off topic...but I'm curious about the Sphere that your avatar is holding...have you written up any "how-to" about that? I have a similar sphere to paint on a wizard and am having a hard time making it work. Any help would be greatly appreciated.
I don't have one written up already but I'll be happy to share how I did it if I can remember right (I painted it a couple years ago).
ReplyDeleteFirst I blended it from black to Scab Red, then to Blood Red, then to Fiery Orange and finally Golden Yellow at the top. Sort of opposite of how you would paint a gem.
Then I began lightly defining the clouds with some thinned down Blood Red paint. The first couple of layers for the clouds were very thin and I could barely see them. I worked my way up through orange and yellow, thin coats, and concentrating the brighter highlights near the top.
The stars were then added with some thinned down white. The tricky part here was getting the white thick enough to be opaque, but thin enough to not look like big globs of paint. When painting something that small with a lot of detail, it's important to make things as smooth as you can. The larger star was painted with a thinned down "+" kind of shape first, and then a dot of pure white was added in the middle.
There's some large pictures up on CMON, if you haven't seen them. http://www.coolminiornot.com/266813?browseid=543864
Hope this helps! Thanks for following
-Matt
Thanks alot Matt...that helps tremendously!
DeleteCheers,
Blue
Just wondering if you wouldn't mind sharing the recipe for the red body of the dread knight? Thank you.
ReplyDeleteHello,
DeleteThe recipe is posted along with a few others above. But here it is again just in case: Red Armor: basecoat Scab Red. Badab Black wash in the crevices. Highlight Scab Red+Blood Red. Final highlights of thinned Blood Red on the edges. Scratches/chips were basecoated with black, highlighted with Codex Grey, Fortress Grey, and then Skull White.
Thanks for reading. Best,
-Matt